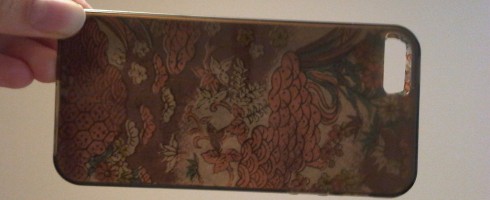
Custom Design iPhone Case

24 Nov

Three Quick Steps

Step 1

Purchase a clear or transparent iPhone case. Gather scrapbook paper, origami paper, or any other kind of patterned paper as well as a pencil and scissors.

Step 2

To measure the paper to fit your phone, place the cell phone case onto the chosen paper and trace around the case with a pencil. You will also want to trace out the hole for the camera lens.

Step 3

Place the cut-out paper inside the clear case, facing outwards and it’s ready to go! You can make multiple case covers and try out a new one every day!

Cinnamon Christmas Candles

19 Nov

Three Quick Steps

Step 1

Gather cinnamon sticks, candles, a glue gun or elastic bands, and ribbon or twine. Arrange a number of cinnamon sticks vertically, all the way around the circumference of your chosen candle. You can experiment with different heights of the cinnamon sticks and different candle widths.

Step 2

Once you have an idea of how many cinnamon sticks you need, you can glue them into place or fasten with elastic bands. Next, tie ribbon or twine around the cinnamon sticks to cover the elastic bands or to decorate the candle. I am also experimenting with adding extra Christmas decorations to complete the candle.

Step 3

Light the candle and enjoy the cinnamon aroma! You can arrange the candles on a mantle piece for the holidays or give them out as gifts for family and friends.

Other scents to try: Replace the cinnamon sticks with real vanilla beans for a fresh vanilla scent!

Four Seasons Collage Box

16 Nov

Three Quick Steps

Step 1

Gather old magazines, glue, scissors, and box that you would like to use for storing seasonal items such as holiday cards.

Step 2

Cut out magazine photos and meaningful words or phrases into different shapes and sizes and organize the clippings into piles based on seasonal themes. For example, on the summer side of my season collage I chose words like beach, sun, and sail and chose pictures of water, sand, sandals, and surfing to illustrate the summer theme.

Step 3

Begin arranging the photos onto one side of the box at a time, starting with the larger photos and then adding smaller photos into the gaps. Remember that the photos can overlap. Once you are happy with the placement, you can glue into place. The idea is to make sure that each collage is adjacent to the season that comes before and after. So, the sides are in seasonal order from summer to fall, winter, and spring. Once you are finished, you can turn the box to face the current season.

Collage Storage Box

6 Nov

Three Quick Steps

Step 1

Gather old magazines, glue, scissors, and an empty box (ie. a shoe box) that you would like to use for storing items such as makeup and beauty products.

Step 2

Cut out magazine photos into different shapes and sizes and organize the clippings into piles depending on what theme or themes that you have decided on.

Step 3

Begin arranging the photos onto one side of the box at a time, starting with the larger photos and then adding smaller photos into the gaps. Remember that the photos can overlap. Once you are happy with the placement, you can glue into place.

Collage Theme Ideas: Music, Food, Makeup/Beauty Products, Keepsakes…the possibilities are endless!

Berry Cubes

6 Nov

Three Quick Steps

Step 1

Place an assortment of your favourite berries (ie. strawberries, blackberries, raspberries, and blueberries) into an ice cube trey and fill the trey with water.

Step 2

Place the ice cube trey into the freezer as you normally would to make ice cubes.

Step 3

Remove the ice cube trey once the berry cubes have frozen and they’re ready to go! You can use these cubes in a variety of beverages for a fun twist.

Other fun icey cubes to try:
Add mint leaves or replace water with fruit juice or chocolate milk! Experiment with different liquid beverages and edible add-ins to find your favourite cube.